How to Never Miss Out on a Job Opening 🤖


TLDR: I explain how you can write an automated script that looks at job postings from companies and emails you the results.
Have you ever been disappointed to know that you got rejected from a job because you applied too late? They already hired someone else!
How many times have you missed out on job opportunities because you didn’t know a company was hiring for that position? It might be the perfect job for you, but you just didn’t know about it!
This script will keep you up to date with job postings so you never miss out on the right job opportunity!
 Scraping is taking data from a website and doing things with it!
I will teach you how to create a script that will automatically fetch job posting data from a company’s website. More specifically, the script will automatically go to “State Farm’s” website and search for specific jobs. Then, it will scrape, or extract, the data from the web page and save it to a text file. After that, you will receive an email with all of the new jobs that have shown up from StateFarm.com. You’ll never miss out on that job opening again!
This will be written in Node.js, and will use the following external APIs: Puppeteer, File System, and Nodemailer.

To view the code on GitHub, visit : here
Setup:
Create a folder on your directory that will hold all of the project files.
$ mkdir automated-job-web-scraping
$ cd automated-job-web-scraping
Automatically create a package.json file which is needed for handling dependencies and metadata.
$ npm init
To install Puppeteer and File System:
$ npm i --save puppeteer
$ npm install file-system --save
Create a main file that contains the code. Most of the scraping code in the next section will be in this file. I saved it as scrape-state-farm.js within a subfolder of the project directory that we created earlier automated-job-web-scraping/src. Src is a folder that I created that includes the primary files.

Time for some automated fun. No humans allowed!
Automation:
Import the external dependencies. We will talk about what constants is later on.
const puppeteer = require('puppeteer');
const fs = require("fs");
const constants = require("./../util/constants.js");
const emailModule = require("./send-email.js");
The code is written with asynchronous I/O in mind. Node.js 8 uses async and await keywords, which you will see throughout the script. async means a function returns a resolved Promise. await means wait until the Promise settles and return its result.
This is basically how the structure works. run() is an async function. When it finishes, the value will be passed in .then((value) => {}. Then you can do some other things which will be discussed later.
async function run() {
   //await
}
run().then((value) => {
   //other things
});
Now comes the web automation part using Chrome Headless. This will automatically launch the headless browser. Set the value to false for testing and true when your script is complete.
const browser = await puppeteer.launch({
    headless: true
});
Set to false when running, true when testing (now).
Before looking at more code, lets think of the flow that needs to happen.
- Open a new browser tab
- Go to the State Farm careers website
- Click on the Location Dropdown
- Select ‘Texas’ location
- Select the Search field
- Type ‘technology’
- Click for the Search button to load the results
- Wait for the page to load
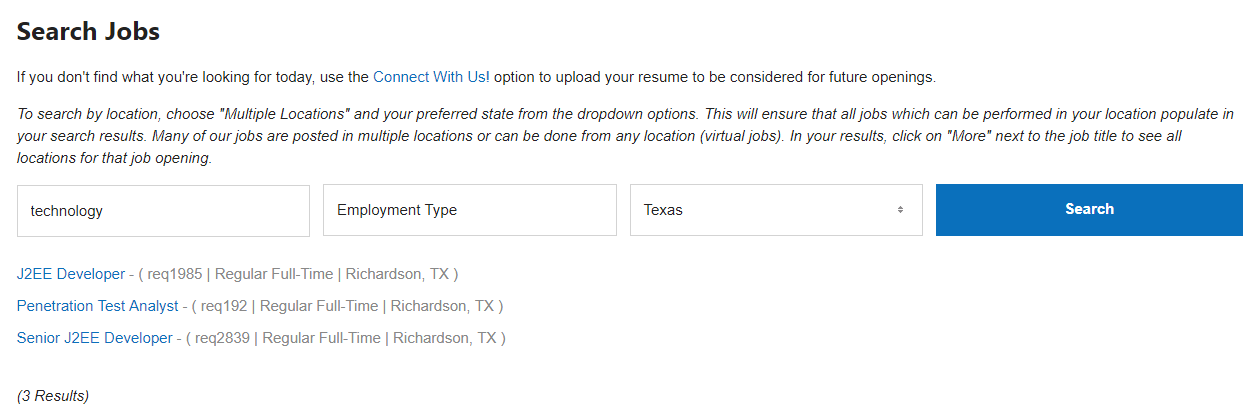
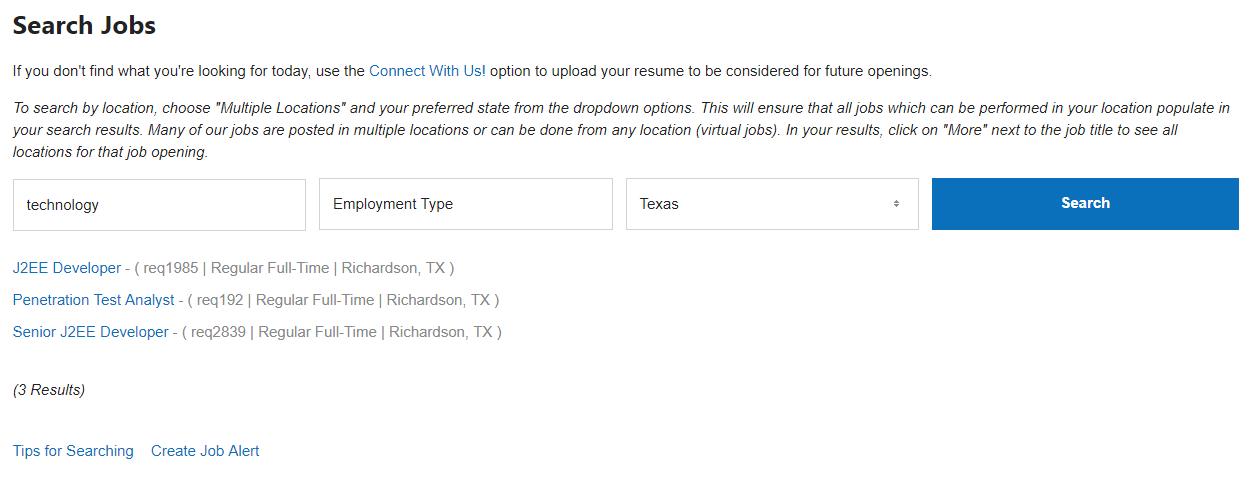
What State Farms website looks like after those steps above. These are the jobs I’m trying to scrape.
Now for some code and explanations:
browser.newPage()will open a new tab in the browserpage.goto()will go to the website we are trying to scrape. In this case, we are going to State Farm’s career website to look for job postings..click()function to click on a section of the web page..keyboard.type()to automatically type something. We only want to see “Texas” jobs..click()function to click on a section of the web page..keyboard.type()to automatically type something. We only want to see “technology” jobs..click()function to click on a section of the web page..waitFor()to wait for the page to load the results.
const page = await browser.newPage();
    await page.goto("https://statefarm.csod.com/ats/careersite/search.aspx?site=1&c=statefarm");
    await page.click("#ctl00_siteContent_widgetLayout_rptWidgets_ctl03_widgetContainer_ctl00_rptCustomFields_ctl02_customFieldWrapper > button");
    await page.click("body > div > ul > li:nth-child(46) > label > span");
    await page.click("#ctl00_siteContent_widgetLayout_rptWidgets_ctl03_widgetContainer_ctl00_rptCustomFields_ctl00_customFieldWrapper_ctl00_txtValue");
    await page.keyboard.type("technology");
    await page.click("#ctl00_siteContent_widgetLayout_rptWidgets_ctl03_widgetContainer_ctl00_btnSearch");
    await page.waitFor(2000);
Selectors as arguments.
You might be wondering what parameters go in those functions. Most of them are selectors. These can be found by using the inspect element in developer tools of your browser (F12).
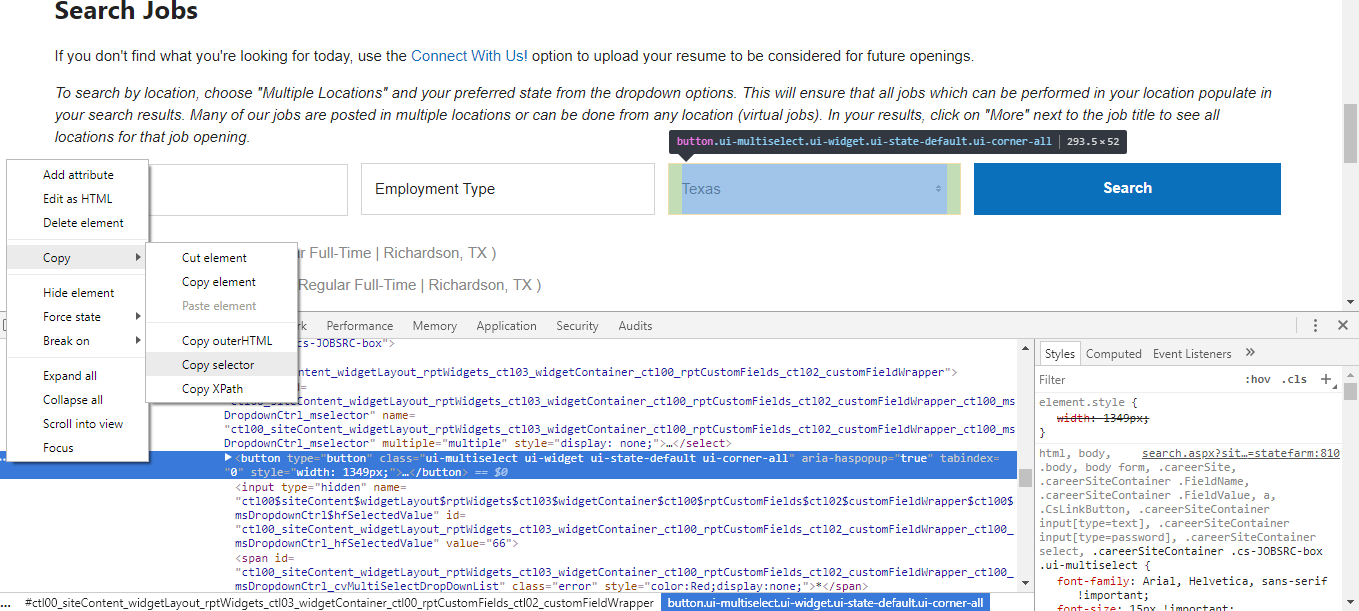
Use Developer Tools to copy the selectors of the elements we want to manipulate.
To make this more flexible and readable, you can store these selectors as constants in a separate file. constant.js is a file in the same project directory that contains all of my constants. This is used because I can easily modify them and the code is easier to read.
The constants are in a new file ./util/constants.js. Remember to import them in scrape-state-farm.js.
module.exports = Object.freeze({

    STATE_FARM_URI : "https://statefarm.csod.com/ats/careersite/search.aspx?site=1&c=statefarm",
    STATE_FARM_LOC_DRPDWN : "#ctl00_siteContent_widgetLayout_rptWidgets_ctl03_widgetContainer_ctl00_rptCustomFields_ctl02_customFieldWrapper > button",
    STATE_FARM_TX_RD_BTN : "body > div > ul > li:nth-child(46) > label > span",
    STATE_FARM_SRCH_FRM : "#ctl00_siteContent_widgetLayout_rptWidgets_ctl03_widgetContainer_ctl00_rptCustomFields_ctl00_customFieldWrapper_ctl00_txtValue",
    STATE_FARM_SRCH_TECH : "technology",
    STATE_FARM_SUBMIT_BTN : "#ctl00_siteContent_widgetLayout_rptWidgets_ctl03_widgetContainer_ctl00_btnSearch",
    SUCCESS_STMT : "File successfully written! - Check your project directory for the state-farm-jobs.txt file",
    STATE_FARM_JOB_SELECTOR : "#ctl00_siteContent_widgetLayout_rptWidgets_ctl03_widgetContainer_ctl00_ctl00 > ul > li:nth-child(INDEX)",
    STATE_FARM_JOB_SELECTOR_ID : "ctl00_siteContent_widgetLayout_rptWidgets_ctl03_widgetContainer_ctl00_ctl00",
    RESULTS_TITLE : "State Farm Jobs in Texas for Technology\n",
    STATE_FARM_NEXT_PAGE_SELECTOR : "#ctl00_siteContent_widgetLayout_rptWidgets_ctl03_widgetContainer_ctl00_pgrList_nextPageLink",
    STATE_FARM_PAGE_CONTAINTER_SELECTOR : '#ctl00_siteContent_widgetLayout_rptWidgets_ctl03_widgetContainer_ctl00_ctl00 > div.results-paging'

});
Before: All of my constants in the constants.js file.
To access the constants by re-writing the code:
const page = await browser.newPage();
await page.goto(constants.STATE_FARM_URI);
await page.click(constants.STATE_FARM_LOC_DRPDWN);
await page.click(constants.STATE_FARM_TX_RD_BTN);
await page.click(constants.STATE_FARM_SRCH_FRM);
await page.keyboard.type(constants.STATE_FARM_SRCH_TECH);
await page.click(constants.STATE_FARM_SUBMIT_BTN);
await page.waitFor(2000);
After: using constants.
Scraping
We will need to get the job results from multiple pages (if there are many job openings). To do this, find out how many pages of jobs there are. Call this function to get the number of pages.
const numPages = await getNumPages(page);
console.log('Number of pages: ', numPages);
Within this async function, we need to pass page. Next, identify the page selector PAGE_CONTAINTER_SELECTOR that contains all of the page numbers.
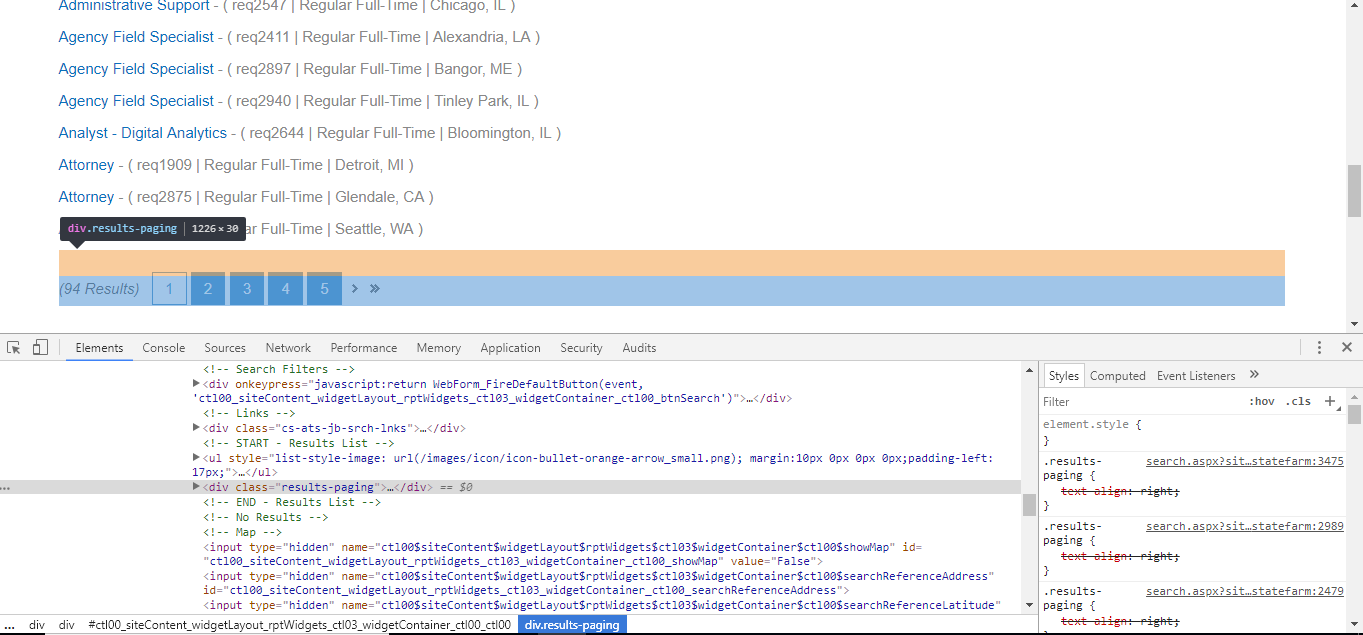
Using Developer Tools again, to copy the selector of the element.
After we have that selector, we need to pass that as an argument. Notice that pageCount is the first time we’ve seen awaitkeyword. PAGE_CONTAINTER_SELECTOR will be passed as sel to document.querySelector(sel). But that was just the container element, so to select each individual page button, use pageContainer.getElementsByClassName();. Next, loop through each page and get the number of pages. If there is no page button, return ‘1’ because there is only 1 page. The data will be stored in pageCount, then we return pageCount.
async function getNumPages(page) {
    const PAGE_CONTAINTER_SELECTOR = constants.STATE_FARM_PAGE_CONTAINTER_SELECTOR;
    let pageCount = await page.evaluate((sel) => {
        let defaultCount = 1;
        let pageContainer = document.querySelector(sel);
        let allPages = pageContainer.getElementsByClassName("pagerLink");
        if (allPages.length > 0) {
            return allPages.length;
        }
        else {
            return defaultCount;
        }
    }, PAGE_CONTAINTER_SELECTOR);
    return pageCount;
}
Loop through the pages. If there’s only 1 page, return 1. If there are 2 pages, return 2, etc.
After calling getNumPages and returning the number of pages, we can now loop through the pages. Then at each page, loop through the list of job postings on the site. Take a look at how the State Farm website is. It has 1 OR multiple pages. Then a list of job postings.

What the site looks like when there are multiple results and multiple pages.
Now look at the code to do the actual web scraping. Again, the outer loop is to loop through the pages and the inner loop goes through the list of job postings.
for (let h = 1; h <= numPages; h++) {
console.log("Page Number : " + h);
let jobListLength = await page.evaluate((sel) => {
    let jobSelectorID = document.getElementById(sel);
    let jobSelectorTagName = jobSelectorID.getElementsByTagName("li");
    return jobSelectorTagName.length;
}, JOB_SELECTOR_ID);

for (let i = 1; i <= jobListLength; i++) {
    let jobSelector = LIST_JOB_SELECTOR.replace("INDEX", i)

    let jobListing = await page.evaluate((sel) => {
        return document.querySelector(sel).innerText;
    }, jobSelector);

    arrayJobResults.push(jobListing);
}
if (numPages != 1) {
    await page.click(constants.STATE_FARM_NEXT_PAGE_SELECTOR);
    await page.waitFor(2000);
}
}
Loop through pages, on each page loop through the list of job postings.
jobListLength returns the number of jobs on 1 page. To do this, find the container selector of all the jobs, get each list item and count them.
let jobListLength = await page.evaluate((sel) => {
    let jobSelectorID = document.getElementById(sel);
    let jobSelectorTagName = jobSelectorID.getElementsByTagName("li");
    return jobSelectorTagName.length;
}, JOB_SELECTOR_ID);
Finds the number of jobs listed on 1 page.
Now that we know how many jobs are on 1 page, we can loop through them. And push the results to an array.
for (let i = 1; i <= jobListLength; i++) {
    let jobSelector = LIST_JOB_SELECTOR.replace("INDEX", i)

    let jobListing = await page.evaluate((sel) => {
        return document.querySelector(sel).innerText;
    }, jobSelector);

    arrayJobResults.push(jobListing);
}
Looping and adding each job to an array.
We have scraped the data for 1 page, but what if there are multiple pages? We actually need to click on the next page button and scrape the next page. We use a familiar .click() function to click on the next page selector. Let’s wait a little while for the next page to load.
if (numPages != 1) {
    await page.click(constants.STATE_FARM_NEXT_PAGE_SELECTOR);
    await page.waitFor(2000);
}
}
If there is more than 1 page, click the next page button.
After we have have gotten the data from all of the pages, we need to close the headless browser. And return all the results to an array.
browser.close();
    return arrayJobResults;
}
After we have our jobs stored in the array, we will do some formatting and log it to the console. Up until now, we haven’t used File System, but here it comes. .writeFile() will take our data and print it to a text file. Think of .then() to do this after the async function has completed.
run().then((value) => {
      let data = value.join("\r\n");
      console.log(data);
      fs.writeFile("state-farm-jobs.txt", data, function (err) {
          console.log(constants.SUCCESS_STMT);
      });
  });
Nicely formatted list of jobs to a text file.
Email:
So far, we have our results saved to a text file which is pretty cool. But now we want to be notified when the script finishes. We will add some code to send us an automated email with the attached state-farm-jobs.txt file. Create a new file called send-email.js and put this in your src folder.
Run commands to install node packages:
$ npm install nodemailer
$ npm i nodemailer-smtp-transport
Copy this code and fill out the details and file path of state-farm-jobs.txt:
   const transporter = nodemailer.createTransport(smtpTransport({
      service: 'Gmail',
      host: 'smtp.gmail.com',
      port: 465,
      auth: {
          user: credentials.email,
          pass: credentials.password
      }
  }));

  transporter.sendMail({
      from: credentials.email,
      subject: "State Farm Jobs",
      text: "Hey, here are the job searches:",
      attachments: [
          {
              'filename': 'state-farm-jobs.txt',
              'path': 'C:/Users/Anthony/Documents/git/automated-job-web-scraping/state-farm-jobs.txt'
          }
      ],
      to: credentials.email
  }, function (error, info) {
      if (error) {
          return console.log(error);
      }
      console.log('Message %s sent: %s', info.messageId, info.response);
      console.log("E-Mail sent successfully to " + credentials.email);
  });
This sends an email (Gmail) with a file attachment.
What does credentials.email and credentials.password mean? If you wanted to, you could enter a String with your email and password but to protect that, I have stored those in a separate file called credentials.js in the util folder.
In credentials.js, fill these values.
module.exports = {
email: "YOUR_EMAIL",
    password: "YOUR_PASSWORD"
}
Data encapsulation.
In your .gitignore file, add the name of the file you want git to ignore/hide. So you would add credentials.js in that file.
Now, back to send-email.js, you would import the credentials file at the top like so,
const credentials = require('./credentials.js');
And when you want to access that data, type (name_of_file).(key):
credentials.email
credentials.password
Modules
We have 2 main Node.js files (in src) which contains our code, scrape-state-farm.js & send-email.js. To run them together we need to package each of them into separate modules and call them in another file. In each one of the files, wrap the code into functions and export them.
function stateFarmModule() {
  //previous code here
}
module.exports = stateFarmModule;


function emailModule() {
  //previous code here
}
module.exports = emailModule;
scrape-state-farm.js goes in stateFarmModule. send-email.js goes in emailModule.
Create index.js and import those exported functions.
const stateFarmModule = require("./scrape-state-farm.js");
const emailModule = require("./send-email.js");

stateFarmModule();
In scrape-state-farm.js, after .then() I will call the email module so that my results are saved to a text file, THEN the email module is called.
run().then((value) => {
        let data = value.join("\r\n");
        console.log(data);
        fs.writeFile("state-farm-jobs.txt", data, function (err) {
            console.log(constants.SUCCESS_STMT);
        });
        console.log("scrape-state-farm.js - created txt file")
        emailModule();
    });
Call the emailModule, to send an email AFTER the results are written on a text file.
Output:
- What the job results look like on State Farm’s website.
- What the job results look like on the text file
state-farm-jobs.txtand theconsole.
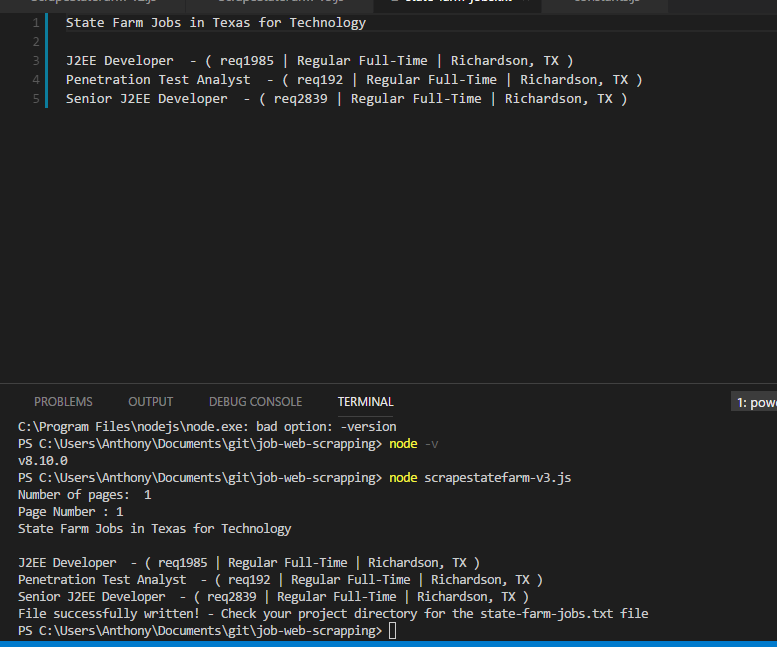
Text file which lists all the jobs as well as the console.
- Check your email. You should have received a message with an attachment containing all of the scraped jobs.
To view the code on GitHub, visit : here
Thanks:
I hope you liked this guide. Please give it a like & follow if you learned something new! This guide by @emadehsan was very useful and helped me when I was stuck. View his source code here.
Thanks for reading! 🙌

- Twitter @anthonyjdella
- LinkedIn @anthonydellavecchia
- GitHub @anthonyjdella
- Medium @anthonyjdella
- Dev.to @anthonyjdella
- TikTok @anthonyjdella